LLX > Neil Parker > String Figures > Jayne
1. Position 1.
2. Pass right thumb behind left far little finger string, and then under it and up into the loop. Return partway with left far index string, but do not pull strings tight.
3. Pass left thumb behind right far little finger string, and then under it and up into the loop. Return with right far little finger string. Release little fingers and pull strings tight.
4. Pass little fingers from below into thumb loops, and pointing them toward each other, pass them back away under the far thumb string that runs straight across between the thumbs. Hook little fingers down over this string, and pull it down through thumb loops.
5. Insert indexes from above into thumb loops, and pick up the near thumb string that doesn't run straight across (but hooks over another string near the middle of the figure), and return. Release thumbs.
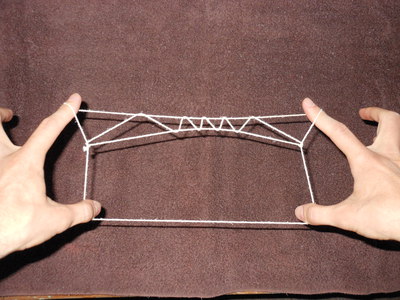
6. There is a large triangle in the middle of the figure. Pass thumbs away from you into this triangle, below the horizontal string that runs across the middle of the figure. Turning them away from each other, pick up the side strings of the triangle and return. For best results, from this point until the figure is done, the strings should be kept tight, and subsequent moves should be sudden and sharp.
7. Insert indexes into thumb loops from above, and pick up near thumb strings, and return. Release thumb loops, and let the new index loops slip down below the original index loops.
8. Transfer upper (original) index loops to thumbs, release index loops, and transfer thumb loops back to indexes.
9. A small vertical loop encircles each little finger loop, near the little finger. Pointing thumbs away from each other, insert them into these loops, and return carring the far strings of the loops.
10. Repeat steps 7 and 8.
11. Pass thumbs away from you over far little finger strings and under all other strings, closer to the middle of the figure than the loops that encircle the little finger loops at each end. Release little fingers.
Note that steps 7 through 11 of this figure are almost the same as steps 9 through 14 of Stairs.
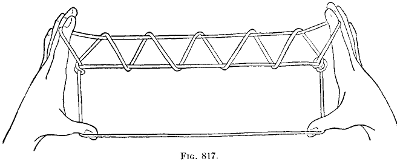
In [Jenness 1924], this figure is called "The Range of Mountains." The Jenness figure (CXXXVI) is made by a similar but more complex method, as the second stage of another figure, "The Kayaker".
1 and 2. The same as steps 1 and 2 above.
3. Insert little fingers from above into thumb loops, and hook down both far thumb strings.
4. Insert index finger from above into thumb loops, and pointing them toward each other, pass them over the near thumb string that runs straight across between the thumbs. Pick up this straight string on the indexes, with a three-quarter turn down, away from you, and up. Release thumbs.
5. Pass thumbs away from over far little finger strings, and pointing them toward each other, catch on their backs the far little finger string that runs straight across between the little finger. Pull this string back over the other little finger strings, and release little fingers.
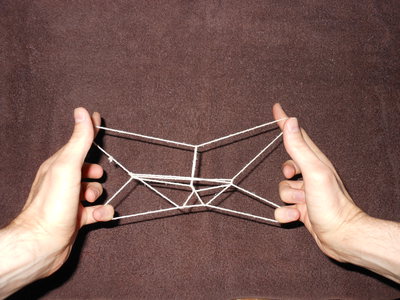
6. You now have a figure with two large diamonds in the middle. Insert little fingers upward into these diamonds (each little finger into the diamond nearest it), and hook down the sides of the diamonds nearest the thumbs.
7. Combine thumb loops by transferring left thumb loop to right thumb, and then inserting left thumb from below into both right thumb loops.
8. Insert thumbs from below into index loops, and pull near index strings toward you, through original thumb loops (which slip off). Release indexes.
9. Turn the figure toward you, so that thumbs are pointing down and little fingers are pointing up, and lay the figure flat on your lap or a table, and withdraw the hands. Pick up the figure again by inserting little fingers upward into near (former thumb) loops, and indexes downward into far (former little finger) loops.
This is "The Kayaker." To turn it into "The Range of Mountains," continue as follows:
10. There are two horizontal strings running across the middle of the figure, forming the top of the kayak. Pick up these two strings from below with the thumbs.
11. Repeat step 8, and transfer thumb loops to indexes.
12. You now have the same figure as at the start of step 6 of "Clothes Line" above. Continue with "Clothes Line," starting from step 6.
LLX > Neil Parker > String Figures > Jayne