LLX > Neil Parker > String Figures > Elementary School

1. Opening A.
2. Release thumbs.
3. Pass thumbs under index and little finger loops, pick up far little finger string, and return.
4. Pass thumbs over near index string and under far index string, and return carrying far index string.
5. Release little fingers.
6. Pass little finger forward over near index strings and under far thumb strings. Pick up far thumbs strings and return.
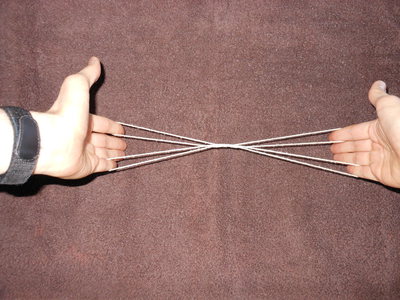
7. Release thumbs. The figure at this stage was called "Cat's Whiskers." To illustrate the meaning, hold the figure up to your face, with the central portion directly under your nose.

8. Pass thumbs over index loops and insert into little finger loops from below. Return with near little finger strings.
9. Insert thumbs from below into index finger loops, closer to the index fingers than the palmar strings that cross the index loops. This can be an awkward move to make...it helps to do it one hand at a time, using the fingers of the other hand to stretch out the near index string and put it over the thumb.
10. Lift the lower near (original) thumb strings past the upper thumb strings, and off the thumbs, dropping them on the far side of the thumb.
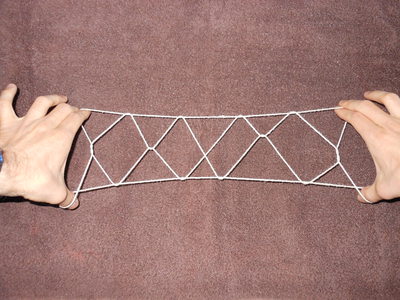
11. There should now be a triangle wrapped around each thumb loop. Put index fingers down into these triangles. Release little fingers, and rotate indexes a half-turn away from you and up, allowing their original loops to slip off, and catching up the far triangle strings. Extend by turning hands away from you.
This was the rarest and most prized of the figures known on my elementary school playground. At first it was known to only one girl, who guarded it jealously.
This figure appears to be of Japanese origin. It found its way to Hawaii, whence it seems to have been carried all over the world by sailors. In several places people have found ways to make it from new openings...my favorite is the Hawaiian method ([Dickey 1928]):
1. Arctic Opening B (made left-handed in Hawaii).
2. Pass thumbs over near index strings and under far index strings. Return with far index strings.
3. Continue with step 6 above.
Another alternate opening comes from the Patomana people of Guyana, South America ([Lutz 1912]):
1. Place the loop on the wrists.
2. With the right hand, reach under the left near wrist string, and grab the left far wrist string. Pull it forward, under the near string, then up in front of the figure, then back over the near string. Pass it between the left ring and little fingers, and around the back of the left little finger.
3. There is a left palmar string, running diagonally from the near side of the left little finger to loop around the left near wrist string. Pass the right little finger, from above, down behind this diagonal palmar string. Return to the right, straightening the right little finger with a half-twist away from you and up.
4. Remove the wrist loops, and place each loop on the index finger of the same hand.
5. Continue with step 6 above.
A slightly simpler version of the same opening comes from the Ulungu people of central Africa ([Cunnington 1906]):
1. Place the loop on both wrists.
2. With the right thumb and index, reach under the left near wrist string, grab the left far wrist string, and pull it foward under the near string. Give it a half-twist (180 degrees) in either direction. Pass both little fingers away through the new loop held by the right hand, and release the loop from the right thumb and index.
3. Remove the wrist loops, and place each loop on the index finger of the same hand.
4. Continue with step 6 above.
There are also some completely unrelated methods of making this same figure. Here's one from the Wajiji people of central Africa ([Cunnington 1906]):
1. Place the loop on both wrists.
2. With the right hand, grasp the near wrist string and give it a half-twist (180 degrees) in either direction, making a small loop. Pass both thumbs away from you through the small loop, and extend.
3. The far thumb strings cross in the middle of the figure, before going down to become the near wrist strings. Draw this cross away from you, over the far wrist string, and place it over a toe, or have an assistant hold it.
4. Turn thumbs down away from you, over the far thumb strings. Keeping the thumbs hooked in their loops, let the wrist loops slip up and off of both hands.
5. Pass little finger from below into thumb loops, close to the thumbs. Catch on their backs the strings that cross the thumb loops diagonally, and return, carrying these strings under all other strings. Release the strings being held by the toe (or assistant).
6. Transfer thumb loops to middle fingers.
7. Pass thumbs over middle finger loops and under near little finger strings, and return with near little strings.
8. One hand at a time, with the fingers of the other hand, lift the middle finger loop off the middle finger, and place it over all five fingers of the same hand. Keep it near the tips of the fingers.
9. One hand at a time, grab the lower (original) near thumb string with the fingers of the other hand, and lift it off the thumb. Pass it around the back of the middle finger, and release it, so that it becomes a middle finger loop (turning over in the process).
10. Release the loops held on the tips of all five fingers (the ones created in step 8 above).
11. Release little fingers.
And here's a method from the Andaman Islands ([K. Haddon 1912]):
1. Position 1.
2. Transfer thumb loops to index fingers (this results in Position 1 on the indexes and little fingers instead of the thumbs and little fingers).
3. Pass thumbs under near index strings, and then between palms and palmar strings. Return carrying palmar strings under near index strings.
4. Grab the far little finger string with the mouth, and pull it forward over the near index string.
5. Pass left thumb from above into mouth loop and pick up right mouth string. Pass right thumb under mouth loop and return with left mouth string under right-mouth-left-thumb string. Release mouth.
6. One hand at a time, with the fingers of the other hand, take the lower (original) near thumb string and lift it up past the upper thumb loop off the thumb, and drop.
7. Transfer thumb loops to indexes.
8. Pass thumbs under index loops and pick up lower far index strings near the indexes.
9. Pass thumbs into upper index loops and return with upper near index strings.
10. Pass middle fingers into upper index loops from above, and pick up lower near index strings.
11. One hand at at time, with the fingers of the other hand, pick up lower thumb loops and lift them past the upper thumb loops and off the thumb, and drop.
12. Release little finger loops and both index loops.